Showing posts with label Hobbycraft. Show all posts

Wednesday, 11 March 2026

Quilted Kindle Sleeves


My sister and I recently purchased the new style Kindles to replace the ones
we had owned for over twelve years.

I wanted to have a go at making quilted sleeves for them, to protect them
when taking them out and about.

I have been following Sam at Curious Handmade on Instagram for a while,
and remembered she had sew along for a quilted book sleeve which I thought I could 
use as a template for the Kindle.

The details can be found HERE on her YouTube channel.


Here is the first one I made for myself, which you can see I made slightly
 too small. I didn't allow enough width on the seam allowance, but I'm pleased to say
it came out ok and is a snug fit for my Kindle!


I used two co-ordinating fabrics from a set of Hobbycraft fat quarters
which have been in my stash a long while.

I then made this one for my sister, taking more care with the measurements
 and this time and it turned out much better and a good fit.


For my sister's cover, I used two co-ordinating fabrics from a fat quarter bundle that
I am sure I bought from Sarah at Flutterby Fabrics during lockdown.
Sarah runs a fabulous online fabric shop on Facebook which you can find HERE

The buttons used were from my stash and the hair bobbles were from Primark.

I really enjoyed making these sleeves, and found them to be nice, easy projects to make,
following Sam's clear and precise instructions.

I definitely recommend giving Sam a follow on both Instagram and YouTube where
you will find lots of inspiration, projects, sewing hints & tips. 

Thank you for visiting my blog today.
Janice x


Wednesday, 23 October 2024

Crocheted Pumpkins and Leaves

Today, I am sharing some crocheted pumpkins and leaves I made recently.
After making this set of pumpkins for a friend, I decided to make myself some
along with the crocheted leaves.


I used these fabulous YouTube tutorials...
Pumpkins - Bella Coco
Pumpkins stalks - Tuula Maaria
Leaves - Blossom Crochet

I really recommend visiting their YouTube channels, as you will find there there
 are lots of tutorials to follow with easy instructions.

For the pumpkins I used Hobbycraft Knitcraft Everyday DK in Orange and Rust
and for the leaves I used scraps of leftover yarn in my stash.


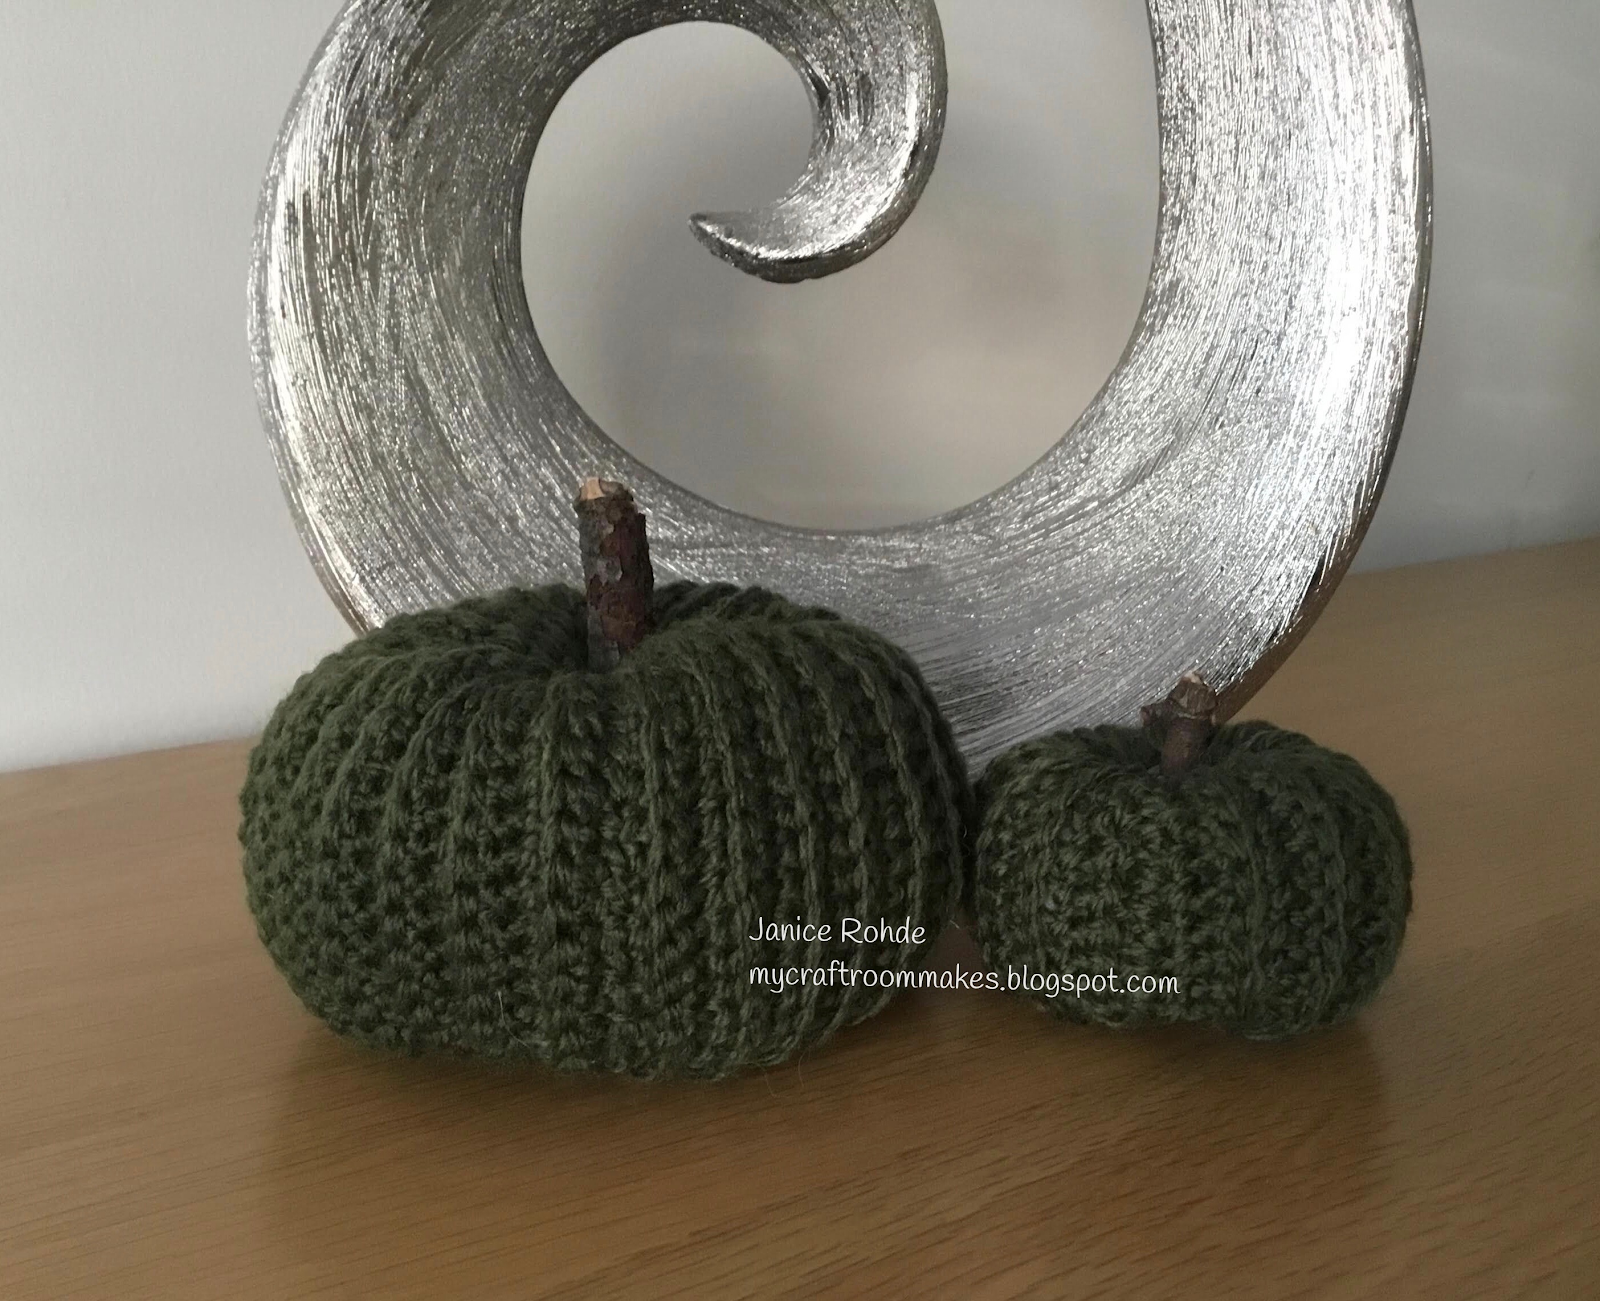
When I taught myself to crochet four years ago, I made a few pumpkins
using some green wool that I had been practicing with.
 I wasn't experienced enough to make the stems, so I used
some twigs instead! They're still securely in place and come out every year,
along with the 'Memory' pumpkins I made with my husband's socks.


Thank you for visiting my blog today.
Janice x
Friday, 22 March 2024

A Crocheted Throw/Blanket for my Niece

Today I am sharing a crocheted throw I have made for one of my nieces.


She found this design of a knitted blanket on the Dunelm website, and asked  
if I could crochet something similar.

I used the lovely textured Cluster stitch which you can find HERE on
the 'Blossom Crochet' YouTube channel.

Rebekah’s tutorials are very easy to follow. She has lots of different
crochet stitches, tips and techniques to share on her YouTube channel
and her Instagram account found HERE


I started by deciding how wide I wanted the throw to be and using a
4mm crochet hook I chained 146 stitches.

I then crocheted the two row repeat pattern until I reached the desired
length, (larger than my usual blankets) and I didn't add a border.


I purchased the yarn from Hobbycraft
using 11 x 100g balls of Women's Institute Premium Acrylic
in the colours Bright Lilac, Light Pink, Cream, Mustard, Honey, Soft Blue,
Denim, Vanilla, Aqua, Hot Pink and Magenta.

Thank you for visiting my blog today.
Janice x

Tuesday, 16 January 2024

A Crocheted Throw/Blanket

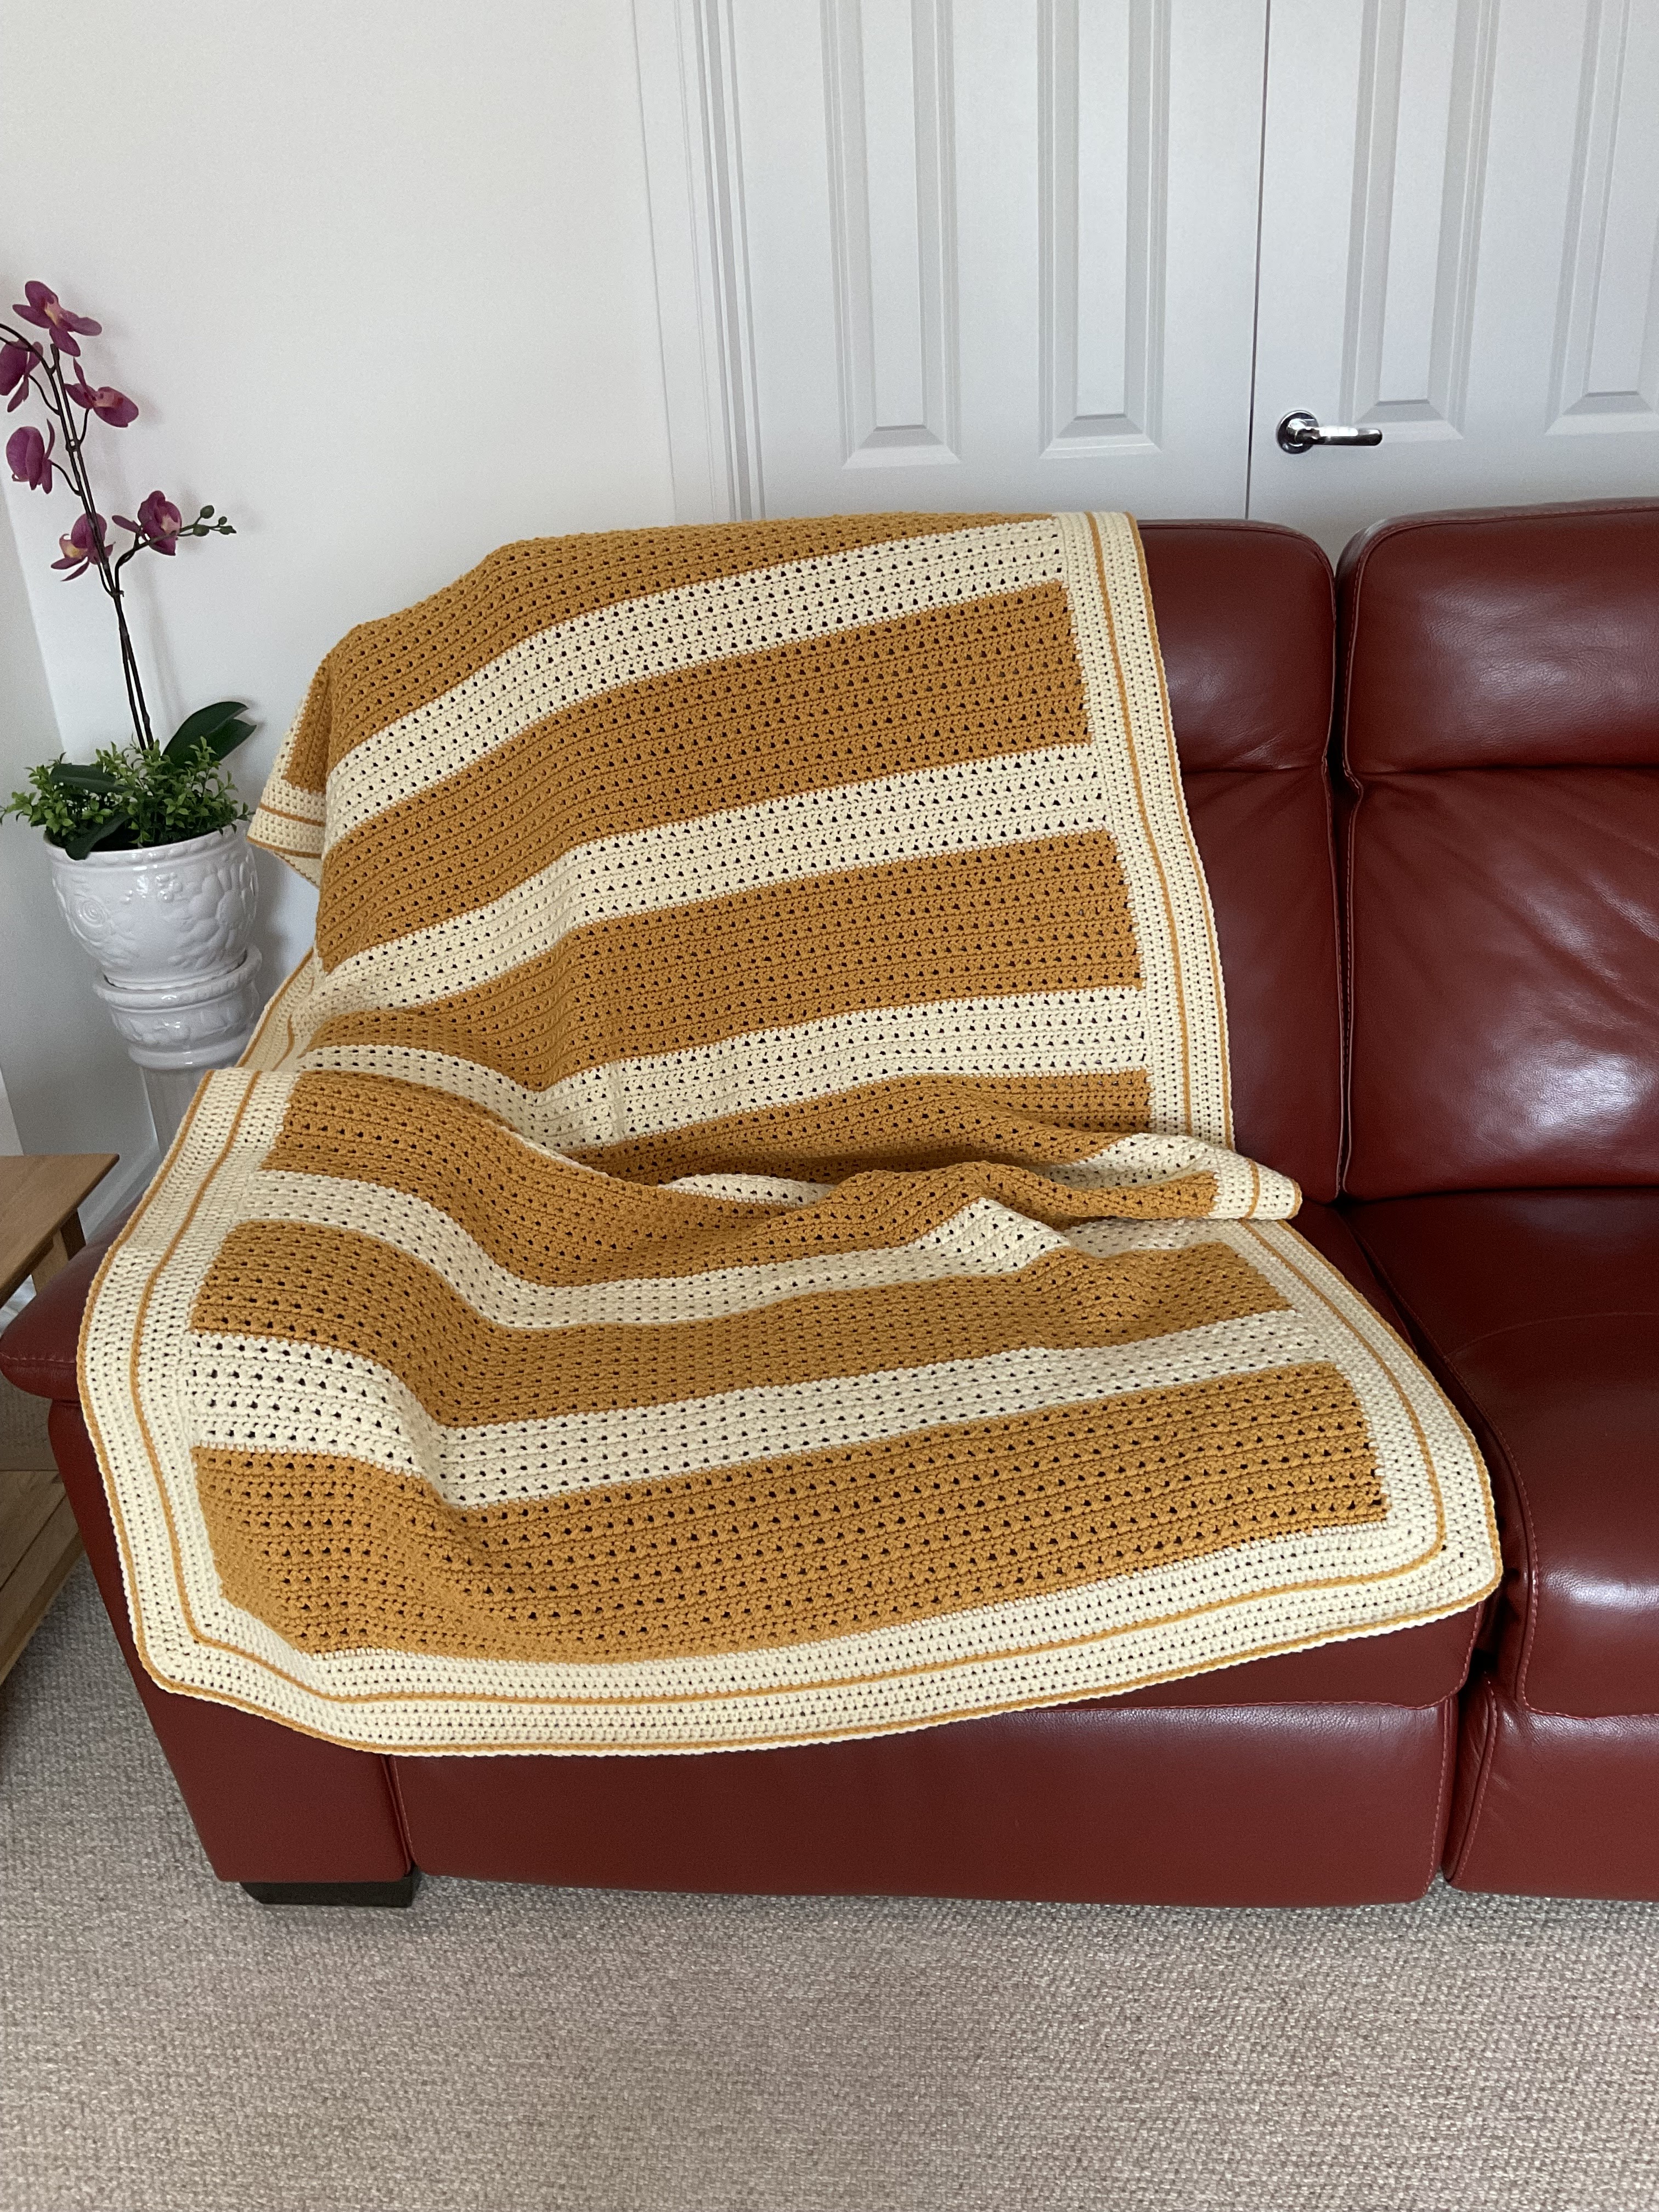
Today I am sharing a crocheted throw I made last year for my sister-in-law.

I used the lovely textured Crossed Trebles stitch which I found HERE on
the 'Blossom Crochet' YouTube channel.

Rebekah’s tutorials are really easy to follow and she has lots of different
crochet stitches to share.

I started by chaining 120 stitches and then crocheted the two row repeat pattern 
until I reached the desired length.

I finished by crocheting a border of one row of double crochet, three rows of 
half trebles, one row of slip stitch, three rows of half trebles, one row double crochet
and one row slip stitch. 


I purchased the yarn from Hobbycraft
using 9 x 100g balls of Women's Institute Premium Acrylic
 5 in ‘Mustard’ and 4 in 'Cream'

Thank you for visiting my blog today.
Janice x


Friday, 22 September 2023

A Crocheted Throw/Blanket for my Nephew


Today, I am sharing a crocheted throw/blanket I made earlier in the year
for one of my nephews who is a life long West Ham football supporter!


I used the lovely textured Textured Trebles stitch which I found HERE on
the 'Blossom Crochet' YouTube channel.

Rebekah’s tutorials are really easy to follow and she has lots of different
crochet stitches to share.


I started by deciding how wide I wanted the throw to be and using a
 6mm crochet hook I chained 120 stitches.

I then crocheted the two row repeat pattern until I reached the desired length.

I finished by crocheting a border of one row of double crochet, four rows of 
half trebles, one row of slip stitch and one row of half trebles.


I purchased the yarn from Hobbycraft
using 9 x 100g balls of Women's Institute Premium Acrylic
 5 in ‘Plum’ and 4 in 'Turquoise'

Thank you for visiting my blog today.
Janice x


Friday, 17 March 2023

Lego Themed Birthday Card

Today I am sharing the card I made for my great nephew who celebrated
 his 4th birthday this week.


As he loves Lego, I looked on Pinterest to get some ideas for a Lego
themed card. 


The products I have used are:
Couture Creations A4 Embossing Folder - Swiss Dots
Sizzix Triplets dies - Cupcakes
Cuttlebug Alphabet/Number dies - Olivia
Alphabet dies - Brand unknown
Hobbycraft - Circle punch

 Thank you for visiting my blog today.
Janice x

Friday, 17 February 2023

Table Place Cards

I was recently asked by a friend if I could make some table place cards
for a special birthday lunch.

The colour scheme for the event was rose gold, and I found some
lovely glitter card in Hobbycraft to use.

 
My friend also came up with the idea to include her guests menu choices 
on the inside of the card. This helped with everyone knowing what they
 had pre-ordered and of course when folded over, it helped the waiting staff too!


The leaf die-cut was glued directly onto the card base, and I used 3D foam pads 
for the name.

The products I have used are:
Spellbinders Nestabilities Rectangles and Scalloped Rectangles
Leaf die - Brand unknown
Hobbycraft - Rose Gold Glitter Effect Card

Thank you for visiting my blog today.
Janice x

Tuesday, 10 January 2023

Same Style Masculine Card, Four Different Colours

 During November and December, I made four masculine cards, two for
my nephews and two for friends.

I settled on this design, and decided to make them in different colours
and slightly different styles.


The products I have used are:
Memory Box - Happy Birthday
Couture Creations A4 Embossing folder - Swiss dots
Docrafts Xcut Embossing Folder - Tartan
EK Success punch - Small circle
Hobbycraft punch - circle

Thank you for visiting my blog today.
Janice x


Friday, 16 December 2022

Crocheted Infinity Scarves

Sharing two Infinity scarves crocheted for my sister and a friend using
Melanie Ham's pattern which you can find HERE on her blog and HERE on YouTube

For my sisters scarf, I used 2 x 50g balls of Stylecraft DK, Batik Elelments
in the shade Titanium 


I purchased this yarn from The Cheap Shop, Tiptree, Essex


For my friend's scarf I used 1 x 100g ball of James C. Brett Stonewash DK
in the shade: SW14 Heather


I purchased this yarn from Hobbycraft and used a 5mm crochet
hook for both.


These are easy projects to make and are good for making 'on the go',
as everything fits into a zip-lock bag.

Thank you for visiting my blog today.
Janice x


Wednesday, 22 June 2022

Masculine Birthday Card

 Today I am sharing a quick and easy CAS masculine birthday card I made recently.

After embossing the card base with the wicker folder, I die-cut the sentiment
in black card and black 3D foam, glued them together and added to the card.

Lastly, I added the card candi made with the small circle punch and using
3D foam squares.

The products I have used are:
Penny Black - Happy Birthday
Docrafts - Xcut Embossing Folder - Wicker
Hobbycraft - Small Circle punch


Thank you. for visiting my blog today.
Janice x


Friday, 28 January 2022

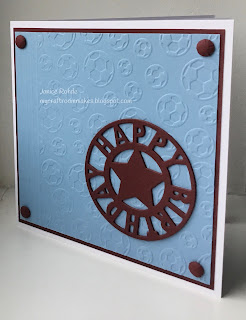
Birthday Card for my Nephew

 Today's card is one I made for my nephew for his birthday which was 
just before Christmas. 

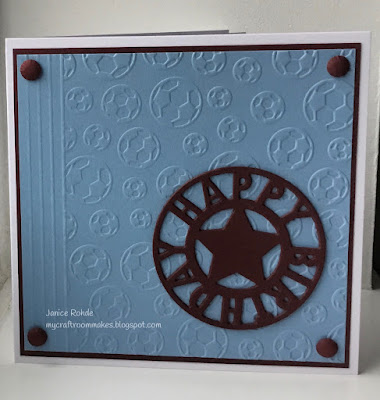
He is a West Ham United football supporter, so I made the 
card in the team colours of claret and blue.

I partially embossed the blue card using the football embossing folder
and added the scored lines using my Hougie board.
I mat and layered it to the claret card and glued it to the card base.
I die-cut the sentiment three times in the claret card, glued them
together to give some dimension.
To finish, I added some hand made card candi.

The products I have used are:
Crafters Companion Embossing folder - Football Crazy
Happy Birthday die - Brand unknown
Hand made card candi
Hougi Board

I was due to post my Design Team card today for the My Time to Craft Challenge,
but sadly Shell has made the difficult decision to close the challenges for the 
next 6 months. You can read her post HERE

Hopefully it’ll be back up and running again in August. 

Thank you for visiting my blog today.
Janice x

Monday, 13 September 2021

Male Birthday Card

Today, I am sharing a birthday card I made recently for a friend to 
give to her husband.
I started by making an A5 card base in black card.
I decoupaged the DIY image, then mat and layered it, along with the embossed 
panel and the computer generated sentiment.
I added the small punched circles and the card candi to finish.

The products I have used are:
Decoupage Image from The Best of La Pashe CD-Rom 2012
Cuttlebug Embossing folder - Spots and Dots
Stitched banner die - brand unknown
EK Success punch - Small circle
Home made card candi

Challenges entered:
Crafter’s Castle - Anything Goes
CD Sunday Challenge - Anything Goes
Dragonfly Dreams - Happy Birthday
Crafty Catz - Masculine Birthday

Thank you for visiting my blog today.
Janice x

Friday, 30 July 2021

My Time to Craft Christmas #015 - 'Plaid/Gingham'

 new challenge starts today over at  My Time to Craft Christmas where the 
theme this fortnight is 'Plaid/Gingham'

Sharing my design team card...


The details of the challenge can be found HERE

This was a very quick and simple card to make. I like using the sentiment
as the focal image on a card.

The products I have used are:
Spellbinders Labels Sixteen
Hobbycraft wood mounted stamp - Merry Christmas Script
GCD Studios Paper Pad - Deck the Halls
Handmade card candi
Challenges entered:
The Holly and Ivy Christmas Challenge  - Anything Christmas Goes
Christmas Craft Creations - Anything Goes
Thank you for visiting my blog today.
Janice x

Tuesday, 6 April 2021

Male Birthday Card

Today, I am sharing a card I made for a friend who celebrated
his birthday last month.

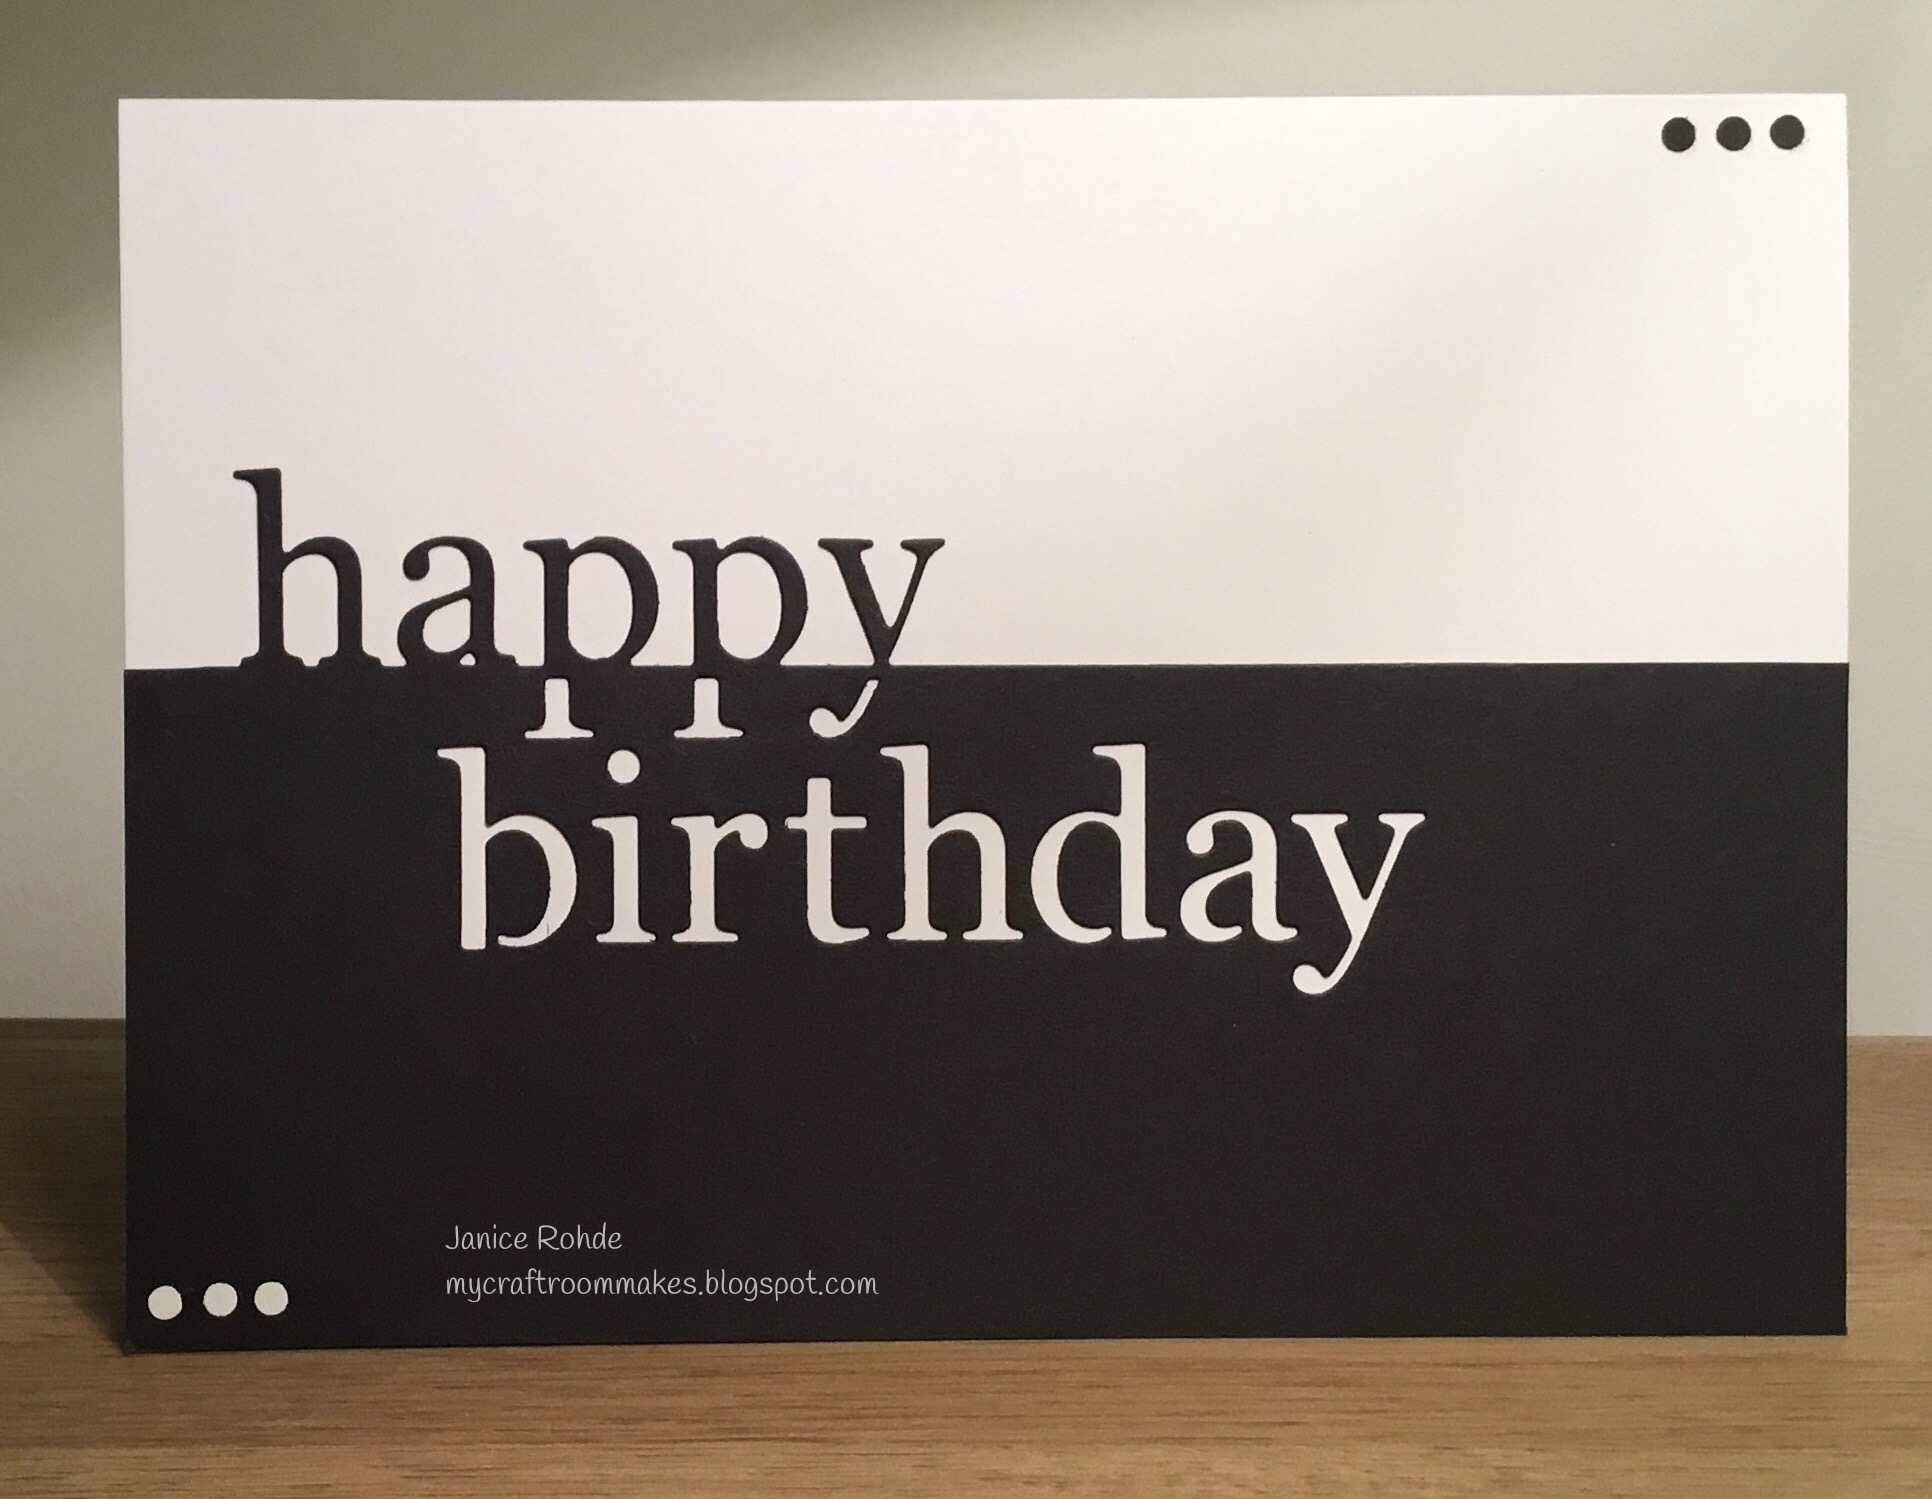
Using snippets of paper and card from my ever growing stash, I started by embossing the card base front with the ‘Distress’ embossing folder, and the black card with the ‘Houndstooth’ folder.

Next, I mat and layered the paper and sentiment onto black card.
Lastly, I added the three punched circles in the corner.

I really like this layout which I came across on 
Pinterest, so I’ll definitely be using it again.

The products I have used are:-
Woodware stamps - Made For You
Cuttlebug Embossing Folder - Houndstooth
Crafter's Companion 'Textures' Embossing Folder - Distress
Hobbycraft Circle Punch
Challenges entered:-
Allsorts Challenge - Anything Goes option Monochromatic  
TTCRD - Anything Goes

Thank you for visiting my blog today.
Janice x


Monday, 29 March 2021

Mother’s Day Card

Today I am sharing a Mother’s day card my friend asked me to
make for her to give to her Mum.
I enjoyed using the pearlescent chalks to colour the embossed flowered frame. 
They were one of my very first purchases many years ago and they are 
still as good as new.

The products I have used are:
Spellbinders Nestabilities - Blossom
Lux Craft from Hobbycraft Embossing Folder and Die Set - Floral Frame
Pebbles Inc - Pearlescent Chalks
Sentiment - Computer generated

Challenges entered:
Dragonfly Dreams - Include a Flower or Flowers
Crafts Galore Encore - Anything Goes
Creative Craft Cottage - Clean and Simple

Thank you for visiting today.
Janice x


Friday, 26 February 2021

My Time To Craft Christmas Challenge #004 - Flowers

 A new challenge starts today over at  My Time to Craft Christmas 
where the theme this fortnight is 'Flowers'

Sharing my design team card...

The details of the challenge can be found HERE


I embossed the top part of the white card panel with the poinsettia embossing
folder, then I embossed two lines underneath using my Hougie board.
I die-cut the poinsettia in white card which I then coloured with Promarkers.
I mat and layered this panel onto a piece of card which I had also coloured
the edges with Promarkers to match the flower.
Next I stamped the sentiment, glued the layers of the poinsettia, and placed
on the panel using 3D foam pads. Lastly I added the leaves.

The products I have used are:-
Spellbinders Shapeabilities - Layered Poinsettia
Woodware punch - Leaf spray
Hobbycraft - Sentiment stamp
Merry and Bright Embossing folder - Quick Cards magazine free gift

Challenges entered:-
Fab 'n' Funky - Christmas
The Paper Shelter - Clean and Simple
Watercooler Wednesday - All About Occasions
Merry Little Christmas Challenge - Anything Goes
The Holly and Ivy Christmas Challenge - Anything Goes
Get Creative - Anything Goes/Optional - Use Red or Pink

Thank you for visiting my blog today.
Janice x