Pages

Monday, 29 November 2021

A Harry Potter Themed Birthday Card

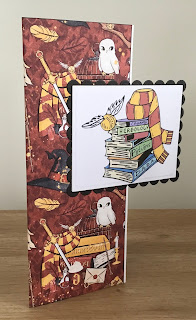
 Today, I am sharing the birthday card I made for my great niece
who loves anything to do with Harry Potter.

I found the free backing paper and image to use online. I mat
and layered the image onto black card. I then cut half of the front of the card
base away and glued the HP paper onto it.
Lastly, I added the sentiment, numbers and some black diamond shapes.

The products I have used:
Spellbinders Nestabilities - Rectangles and Scalloped Rectangles
Paper Roses - Happy Birthday (small)
Craft Stash - Alphabet die

Thank you for visiting my blog today.
Janice x


Friday, 26 November 2021

My Time to Craft Challenge #471 - 'Stitching - Faux or Real'

 A new challenge starts today over at My Time to Craft where
the theme this fortnight is  'Stitching - Faux or Real'

Sharing my design team card...

All the details of the challenge can be found HERE

This was a really quick and easy card to make. I started by
embossing the stitched oval die directly onto the base card.

Next I die cut the whole of the rosebud in green card, and the petals 
in pink. I glued the complete flower onto the card and paper pieced
the petals, adding a pearliesd gem to the centre.

Lastly, using my Misti stamping platform, I added the sentiment.

The products I have used are:
Julie Hickey Designs stamps - I Need: Everyday Sentiments
Memory Box Poppy Stamp die - Wild Rosebud
The Works - Stitched Oval die

Thank you for visiting my blog today.
Janice x


Wednesday, 24 November 2021

My 'Inspiration Scribbler' Card for Scribbles Designs

Today, I am sharing my 'Inspiration Scribbler' project, made for the
monthly Scribbler's showcase of Scribbles Designs Challenge Blog
The theme this month is ‘Warm Winter Clothing'

Sharing my design team card...

The details of the current challenge can be found HERE

After colouring the image with Promarkers, I matted it on a square
of red card which I edged with a black Promarker.

Next, I cut a square of DSP, again edged with a black Promarker
and glued it onto the card base.

I then raised the image with 3D foam, added the pearlised gems 

and finished the card with the peel-off sentiment.

The products I have used are:
 Scribbles Designs digi image - #840 Snowman Snapshot
DCWV - The Christmas Printed Paper Pad
Promarkers

Thank you for visiting my blog today.
Janice x


Friday, 19 November 2021

My Time to Craft Christmas #023 - Christmas Treats

 A new challenge starts today over at My Time to Craft Christmas
where the theme this fortnight is 'Christmas Treats'

Sharing my design team card...


The details of the challenge can be found HERE

The products I have used are:
Personal Impressions wood mounted stamp - no name/code
Spellbinders Nestabilities - Ovals and Deckled ovals
DCWV - The Christmas Printed Paper Pack
Banner die - Magazine free gift
Promarkers

Thank you for visiting my blog today.
Janice x


Wednesday, 17 November 2021

Birthday Card for my Nephew

 Today's card is one I made for my nephew earlier this month, using snippets of 
paper and card from my ever growing stash!

I found the idea for this card on Pinterest.

I made the 7"x5" card base using a stone coloured A4 sheet of card.
Next I embossed a smaller piece of brown card with the textured
embossing folder and glued it to the card base.

Using 4 snippets of design papers which I glued to some lightweight card,
I die-cut them with a set of stitched banner dies.

Next, I used a piece of the stone card and die-cut the sentiment banner
with one of the set of Creative Expressions (Sue Wilson) Pierced Flags
from the Frames and Tags set.

Lastly I added the Presscut Happy Birthday and some small circles
punched with an EK Success punch.
Challenges entered:
Pixie's Snippets Playground - Anything Goes

Thank you for visiting my blog today.
Janice

Monday, 15 November 2021

A Bit More Time to Craft Challenge #147 - 'Anything Goes'


A new challenge starts today over at A Bit More Time to Craft Challenge Blog
where the theme is always 'Anything Goes' 

Sharing my design team card, using the 

Details of the challenge can be found HERE
where 3/5 randomly drawn winners will each get to choose
3 sets of Lozzy's papers.
Looking for latest Challenge Here Click Badge Below
I started by printing one of the set of Wash It digi papers onto an A4 sheet
of white card and making a square card base.

Next I printed the co-ordinating Happy Flowers digi paper onto white card,
die-cut the aperture and embossed it with the textures embossing folder.

To finish, I stamped the sentiment, added the floral aperture card using
3D foam, and the pearlised gems.

The products I have used are:
Lozzy's Happy Flowers and Wash It digi papers
Inca wood mounted stamp - Dot Wishes
Spellbinders Labels 3
Crafter's Companion 'Textures' Embossing Folder - Distress

Thank you for visiting my blog today.
Janice x


Friday, 12 November 2021

My Time to Craft Challenge #468 - Texture

 A new challenge starts today over at My Time to Craft where
the theme this fortnight is 'Texture'

Sharing my design team card...

All the details of the challenge can be found HERE

I started by embossing the burgundy base card with the quilted
3D embossing folder which gives a gorgeous, deep embossed effect.

Next I die-cut the 'hello' three times with kraft card, glued them together
to give some depth, and glued it onto the card. I added a few pearlised
gems to finish.

The products I have used are:
Lisa Horton Crafts, 3D embossing folder - Padded Quilt
My Favourite Things - Hello There

Thank you for visiting my blog today.
Janice x


Wednesday, 10 November 2021

New Baby Card

Following on from my post on Monday, showing the baby blanket I crocheted
for my new great niece which you can see HERE, today I am sharing the card I
made for my nephew and wife to welcome their new baby daughter.
I started by die-cutting a heart in the centre of a square piece of card, then
I embossed it with the hearts embossing folder.

 Next, I attached it with 3D foam strips. I printed the sentiment and die-cut it
with the stitched banner die. Lastly I added the pink Memory Box die
cut and pink pearls to the banner.
Thank you for visiting my blog today.
Janice x

Monday, 8 November 2021

A Crocheted Baby Blanket for my Great Niece

Today, I am sharing a crocheted baby blanket I made for my new great niece
who arrived last week. Luckily my niece knew she was expecting a baby girl,
so I had plenty of time to make it before she arrived.
,
I had seen lots of blankets made using the ‘Waffle’ stitch when looking 
online for ideas. I really liked the pattern this stitch created, so I decided to give 
it a try following the Bella Crochet tutorial on YouTube.
It crocheted up fairly quickly and is definitely a good stitch to do 
whilst watching the television.

I finished the blanket by adding a border of treble crochet stitches in white,
 and a row of double crochet in pink. I then wrapped it with a pretty 
crocheted blanket tie. 
I purchased the yarn online from Wool Box who have great prices on
their yarns and provide a very fast delivery service.

I used five 100g balls of Sirdar Hayfield Baby Bonus DK, three in
 'Baby Pink' and two in 'Baby White'

Thank you for visiting my blog today.
Janice x


Saturday, 6 November 2021

Winter Wonderland Christmas Challenge - Candy Canes and/or For a Child

  A new challenge has started over at Winter Wonderland Christmas Challenge Blog 
where the theme for this month is 'Candy Canes and/or For a Child'

Sharing my design team card...
The challenges are held on the first Friday of each month.

All the details can be found HERE

There is no sponsor this month, we're just playing for fun.

After matting and layering the image onto black card and red mirror card,
I glued it directly onto the card base.
I then added some candy cane twine and the sentiment.

The products I have used are:
Hunkdory Christmas image
Woodware punch - Scalloped oval

Thank you for visiting my blog today.
Janice x
 

Friday, 5 November 2021

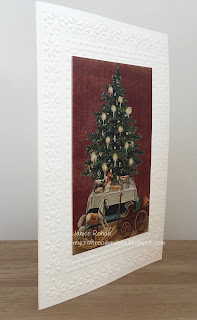
My Time to Craft Christmas #022 - Vintage Christmas

A new challenge starts today over at My Time to Craft Christmas
where the theme this fortnight is 'Vintage Christmas'

Sharing my design team card...

The details of the challenge can be found HERE

This was a very quick and easy card to make, just using an Xcut A4 Christmas
Poinsettia frame embossing folder and a Hunkydory Christmas image.


Thank you for visiting my blog today.
Janice x


Tuesday, 2 November 2021

40th Birthday Card

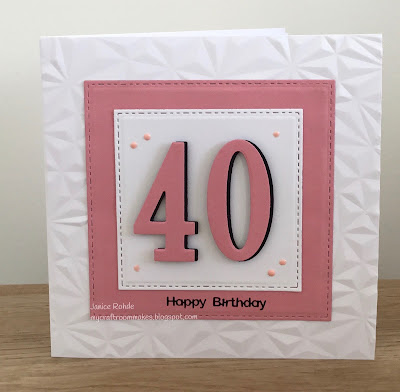
 Today, I am sharing the birthday card I made for my goddaughter.
I started by embossing the card base with the 3D embossing folder.
I then die-cut two different squares, glued them together and then glued
them directly onto the card base. 

Next, I die-cut the numbers in pink card and black
foam, and then slightly off-setting them when I glued them together.
Lastly, I glued the numbers to the white square, added the sentiment and a
few Nuvo drops to finish.

The products I have used are;
Lisa Horton Crafts, 3D embossing folder - Prism
The Works - Stitched squares
Number dies - Brand unknown

Thank you for visiting my blog today.
Janice x